# 一、基本操作原理
# 1、路由原理
每次增删改查一个document的时候,都会带过来一个routing值,默认就是这个document的_id(可能是手动指定也可能是自动生成)
每次把这个routing值先进行hash,产出一个hash值
然后将这个hash值取模,hash / primary shard数量
结果就决定了,document在哪个node上处理
es保证,取模计算结果,结果一定是在0~number_of_primary_shards-1之间这个范围内的
# 2、es写过程
对于写请求,es会选择一个node发送请求过去,这个node就是协调节点
协调节点对document进行路由,将请求转发给对应的node(有primary shard)
实际上是在primary shard上处理请求,然后将数据在同步到replica node
协调节点,如果发现primary node和所有的replica node都搞定之后,会将结果返回给客户端
# 3、es写一致性原理
# 1、每次写(增删改)之前会判断shard活跃情况
one
all
quorum, 所有shard大部分时活跃的
(primary + replicas) / 2 + 1,当replicas > 1时才生效
为什么es采用这种机制 当replicas > 1时才生效:
- 1p1r,quorum=2,若1台服务器,由于相同的shard与realicas不能分配在同一台服务器上,所以此时的shard活跃数是1,写无法进行,es为了避免这种情况的发生
3p,1r 分析:
quorum=3 ,理论上:p0r2,p1r0,p2r1
若2服务器
p0r2,p1r0 ok没问题;p0r2,p2r1 活跃数2,写无法执行
若3台服务器,没问题
# 4、document查询原理
# 1、概述
对于读请求,不一定转发到primary shard 也可以转发到replica shard处理
# 2、过程
- 客户端发送请求到任意一个node,成为协调节点
- 协调节点对document进行路由(es保证,写、读的路由结果是一样的),将请求转发到对应的node,此时会使用随机轮询算法,在primary shard以及其所有replica中随机选择一个,让读请求负载均衡
- 接收请求的node返回document给协调节点
- 协调节点返回document给客户端
- 特殊情况:document如果还在建立索引过程中,可能只有primary shard有,任何一个replica shard都没有,此时可能会导致无法读取到document,但是document完成索引建立之后,primary shard和replica shard就都有了
# 3、分页查询deep paging性能问题:
- 在分布式场景下,多shard,数据是保存在各个shard中的,读的时候,会路由到各个shard,这个过程当然由协调节点负责,最后收集的数据会发送给客户端。
- 想象一下,在分页的情况下,es是怎么查询的?
- 假如有3000条数据,3shard,故每个shard由10000条数据,需求是,查询9990~10000区间的数据。
- 实际上,es执行中,不可能只查询一个shard的9990-10000(因为数据是分片的),所以他会获取每一个shard 9990-10000的数据,然后一起返回给协调节点(数据共计10000*3),协调节点在排序,在选取其中9990-10000区间的数据
- 综上,会有大量数据的在内存操作,影响性能
# 5、document写入原理
# 1、写入流程(演变1)
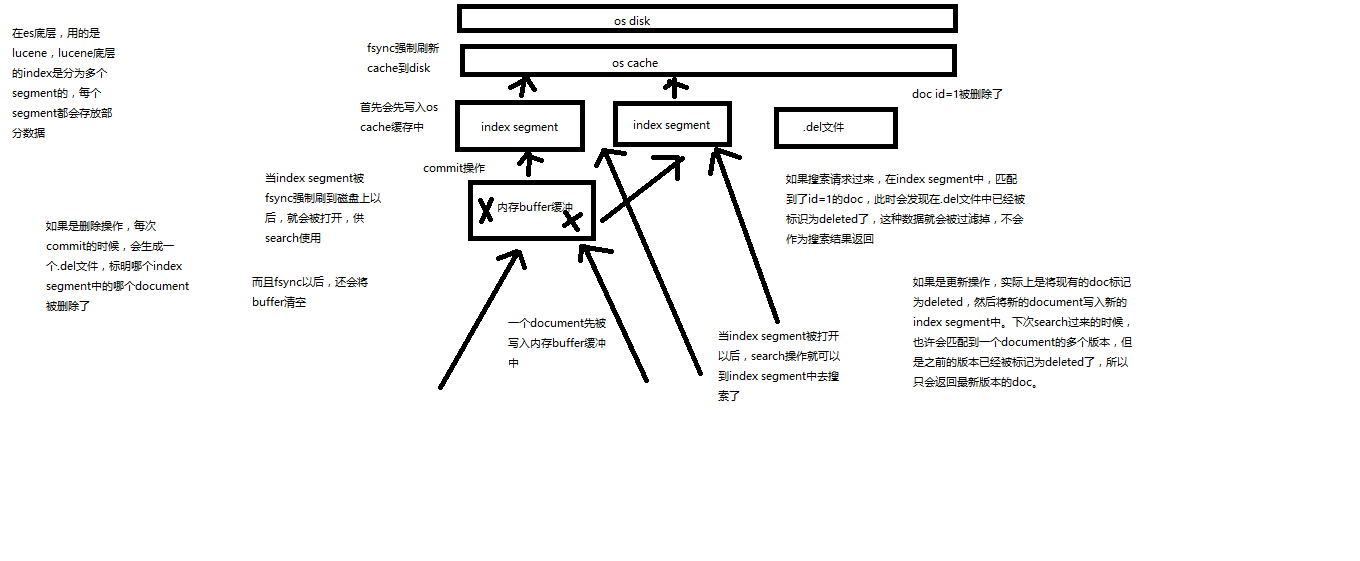
(1)数据写入buffer
(2)commit point
(3)buffer中的数据写入新的index segment
(4)等待在os cache中的index segment被fsync强制刷到磁盘上
(5)新的index sgement被打开,供search使用
(6)buffer被清空

每次commit point时,会有一个.del文件,标记了哪些segment中的哪些document被标记为deleted了
搜索的时候,会依次查询所有的segment,从旧的到新的,比如被修改过的document,在旧的segment中,会标记为deleted,在新的segment中会有其新的数据
2
3
4
5
6
7
8
9
# 2、近实时(对1优化-演变2)
从写入到被查询到,只需要1s,
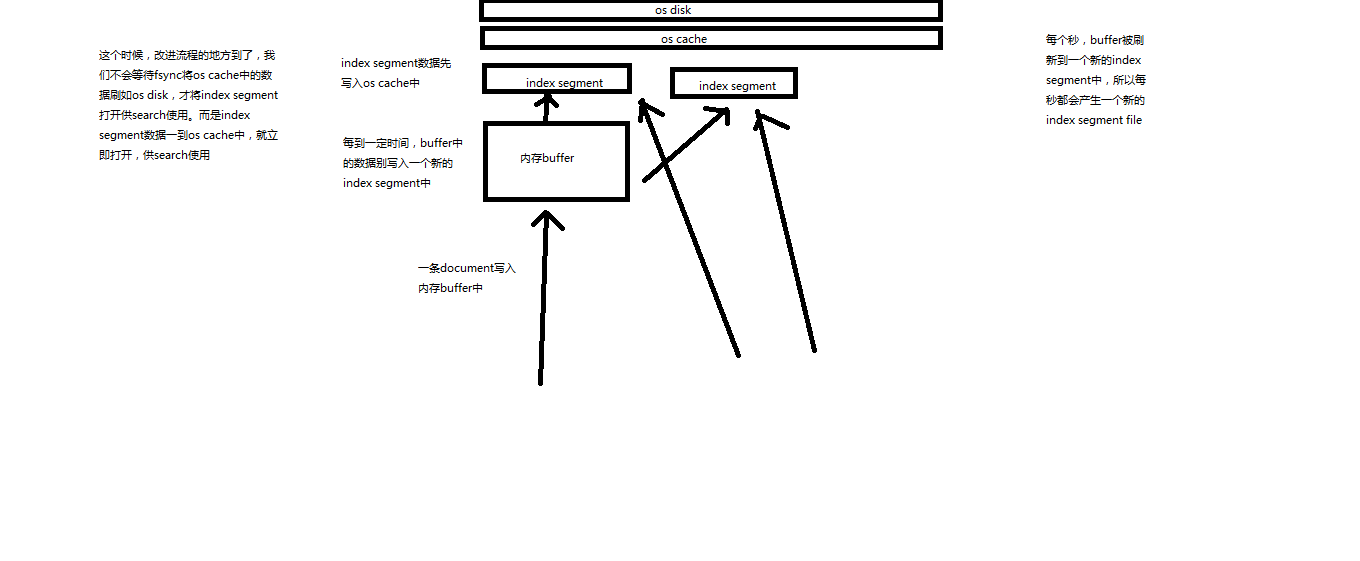
写入流程别改进如下:磁盘IO,很耗时
(1)数据写入buffer
(2)每隔一定时间,buffer中的数据被写入segment文件,但是先写入os cache
(3)只要segment写入os cache,那就直接打开供search使用,不立即执行commit

数据写入os cache,并被打开供搜索的过程,叫做refresh,默认是每隔1秒refresh一次。也就是说,每隔一秒就会将buffer中的数据写入一个新的index segment file,先写入os cache中。所以,es是近实时的,数据写入到可以被搜索,默认是1秒。
2
3
4
5
6
//手动刷,没必要,es默认1s刷新buffer到内存一次
POST /my_index/_refresh

//对于实时性要求比较低时,可以适当延长刷新缓存间隔
PUT /my_index
{
  "settings": {
    "refresh_interval": "30s"
  }
}
2
3
4
5
6
7
8
9
10
# 3、最终版本
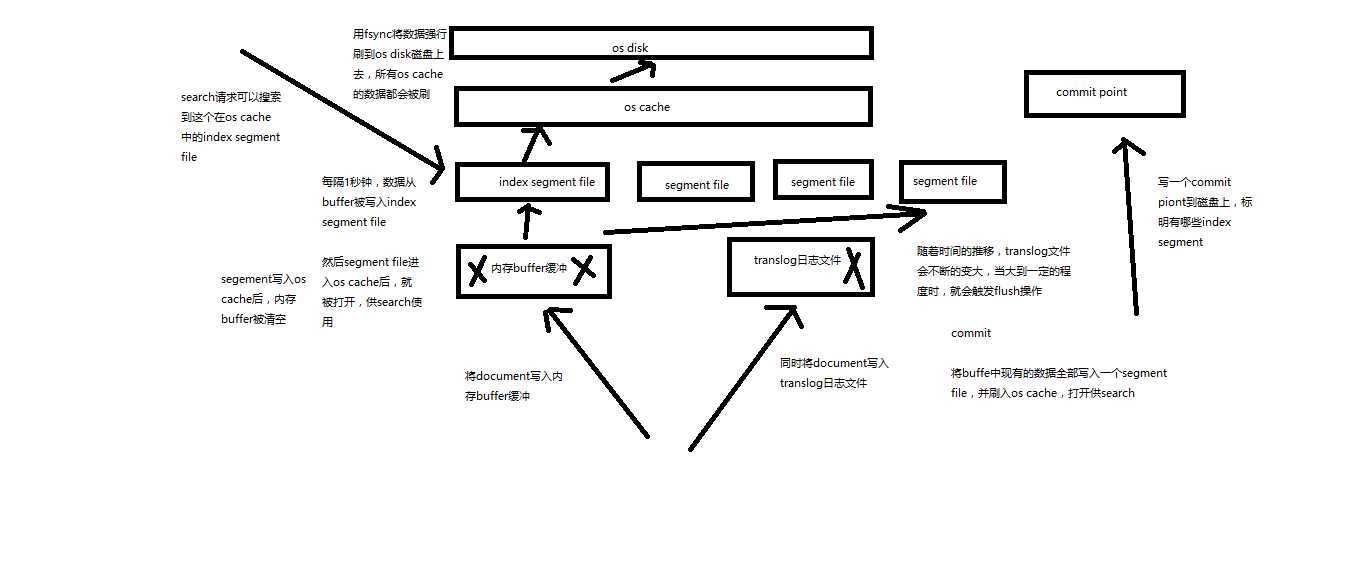

再次优化的写入流程

(1)数据写入buffer缓冲和translog日志文件
(2)每隔一秒钟,buffer中的数据被写入新的segment file,并进入os cache,此时segment被打开并供search使用
(3)buffer被清空
(4)重复1~3,新的segment不断添加,buffer不断被清空,而translog中的数据不断累加
(5)当translog长度达到一定程度的时候,commit操作发生
  (5-1)buffer中的所有数据写入一个新的segment,并写入os cache,打开供使用
  (5-2)buffer被清空
  (5-3)一个commit ponit被写入磁盘,标明了所有的index segment
  (5-4)filesystem cache中的所有index segment file缓存数据,被fsync强行刷到磁盘上
  (5-5)现有的translog被清空,创建一个新的translog

基于translog和commit point,如何进行数据恢复

fsync+清空translog,就是flush,默认每隔30分钟flush一次,或者当translog过大的时候,也会flush

POST /my_index/_flush,一般来说别手动flush,让它自动执行就可以了

translog,每隔5秒被fsync一次到磁盘上。在一次增删改操作之后,当fsync在primary shard和replica shard都成功之后,那次增删改操作才会成功

但是这种在一次增删改时强行fsync translog可能会导致部分操作比较耗时,也可以允许部分数据丢失,设置异步fsync translog

PUT /my_index/_settings
{
    "index.translog.durability": "async",
    "index.translog.sync_interval": "5s"
}
2
3
4
5
6
7
8
9
10
11
12
13
14
15
16
17
18
19
20
21
22
23
24
25
26
27
28
#
# 4、海量磁盘文件合并
# 6、type基本原理
# 1、type底层数据结构
lucene 建立索引的时候,是没有type概念的,在document中,实际上会把type作为field添加到文档列中的,即_type字段,es通过type查询,实际上是通过 _type值来筛选过滤的
{
    "_index" : "mall",
    "_type" : "product",
    "_id" : "5",
    "_score" : 1.0,
    "_source" : {
      "name" : "mall05"
    }
}
1
2
3
4
5
6
7
8
9为什么不建议一个索引多type,或者说,多个type带来哪些问题
- 首先每次查询的元数据会比较大,因为多type,这个控制好的话,对于系统的影响可以控制
- 由于是多个type,所以每个type的数据结构是不同的,放在同一个in dex下,搜索type会被揉到一起去,那么每条数据会有很多field都是空值,浪费资源,产生性能问题
- 而且,如果多type,那么每个type的field在这个index下名称是唯一的,总之,想象一下es的存储方式,即可get到点
- 综上,还是采用一个index一个type的方式较为稳定安全
# 二、应用
# 1、分词器
# 1、内置分词器
Set the shape to semi-transparent by calling set_trans(5)

standard analyzer:set, the, shape, to, semi, transparent, by, calling, set_trans, 5(默认的是standard)
simple analyzer:set, the, shape, to, semi, transparent, by, calling, set, trans
whitespace analyzer:Set, the, shape, to, semi-transparent, by, calling, set_trans(5)
language analyzer(特定的语言的分词器,比如说,english,英语分词器):set, shape, semi, transpar, call, set_tran, 5
2
3
4
5
6
# 2、测试分词情况
GET /_analyze
{
	"analyzer": "standard",
	"text": ""
}
2
3
4
5
# 3、定义分词器
standard
- standard tokenizer: 以单词边界进行切分
- standard token filter: 什么都不做
- lowercase token filter: 将所有字母转换为小写
- stop token filter(默认禁用): 起初停用词
修改索引的分词机制
//设置标准的分词器,且 把过滤掉部分英文
PUT /my_index
{
  "settings": {
    "analysis": {
      "analyzer": {
        "es_std": {
          "type": "standard",
          "stopwords": "_english_"
        }
      }
    }
  }
}

//结果: a dog is in
GET /my_index/_analyze
{
  "analyzer": "standard",
  "text": "a dog is in"
}

//结果: dog
GET /my_index/_analyze
{
  "analyzer": "es_std",
  "text": "a dog is in"
}
1
2
3
4
5
6
7
8
9
10
11
12
13
14
15
16
17
18
19
20
21
22
23
24
25
26
27
28定制化自己的分词器
//定制分词器
PUT /my_index
{
  "settings": {
    "analysis": {
      "char_filter": {
        "&_to_and": {
          "type": "mapping",
          "mappings": ["&=>and"]
        }
      },
      "filter": {
        "my_stopwords": {
          "type": "stop",
          "stopwords": ["the", "a"]
        }
      },
      "analyzer": {
        "my_analyzer": {
          "type": "custom",
          "char_filter": ["html_strip", "&_to_and"],
          "tokenizer": "standard",
          "filter": ["lowercase", "my_stopwords"]
        }
      }
    }
  }
}

//结果: tomandjerry are friend in house haha
GET /my_index/_analyze
{
  "text": "tom&jerry are a friend in the house, <a>, HAHA!!",
  "analyzer": "my_analyzer"
}
1
2
3
4
5
6
7
8
9
10
11
12
13
14
15
16
17
18
19
20
21
22
23
24
25
26
27
28
29
30
31
32
33
34
35
# 2、mapping
# 1、查看mapping
GET /mall/_mapping
GET /mall/_mapping/test
2
# 2、数据类型
- 基本类型
- string、text
- byte、short、integer、long
- float、double
- boolean
- date
- 动态解析(put不存在的的索引文档时数据会默认创建mapping)
- True、false -> boolean
- 123 -> long
- 123.456 -> double
- 2020-01-01 -> date
- "" -> string/text
# 2、更新mapping
# 1、分词影响
field 的 type 是 keyword 不会进行分词
//添加字段content,类型为keyword
PUT /mall2/_mapping/test
{
  "properties": {
    "content": {
      "type": "keyword"
    }
  }
}

//测试分词
GET mall2/_analyze
{
  "field": "content",
  "text": "my dogs"
}

//结果 my dogs,没有分词
1
2
3
4
5
6
7
8
9
10
11
12
13
14
15
16
17
18
# 2、更新
不可以修改、删除已有的字段
解决方案:建立新的索引,重新封装旧的索引数据,再导入到新的索引里
//创建
PUT /mall2
{
  "mappings": {
    "test":{
      "properties": {
        "lu_id": {
          "type": "text",
          "index": false
        },
        "title": {
          "type": "text",
          "analyzer": "english"
        },
        "date": {
          "type": "date"
        }
      }
    }
  }
}

//添加新的字段
PUT /mall2/_mapping/test
{
  "properties": {
    "price": {
      "type": "double"
    }
  }
}
2
3
4
5
6
7
8
9
10
11
12
13
14
15
16
17
18
19
20
21
22
23
24
25
26
27
28
29
30
31
- index,默认true,当设置false,该字段会被存储,在_source中会显示出该字段,但是不能被查询
- type,keyword 不分词
# 3、DSL查询
# 1、bool
must、must_not、should、filter
GET /mall/product/_search
{
  "query": {
    "bool": {
      "must": [
        {
          "match": {
            "producer": "producer"
          }
        }
      ],
      "should": [
        {
          "match": {
            "name": "special"
          }
        },
        {
          "match": {
            "price": 50
          }
        }
      ],
      "must_not": [
        {
          "match_phrase": {
            "name": "special yagao"
          }
        }
      ]
    }
  }
}
2
3
4
5
6
7
8
9
10
11
12
13
14
15
16
17
18
19
20
21
22
23
24
25
26
27
28
29
30
31
32
33
# 2、filter与query
相关度对比解密
filter 只是过滤数据,不会计算相关度,不会排序,对相关度没有影响
query 会计算每个document对于搜索条件的相关度,并按照相关度排序
//query查询,相关度_score=1.0
GET /mall/product/_search
{
  "query": {
    "range": {
      "price": {
        "gte": 30
      }
    }
  }
}
GET /mall/product/_search
{
  "query": {
    "constant_score": {
      "filter": {
        "range": {
          "price": {
            "gte": 30
          }
        }
      }
    }
  }

//filter查询过了,相关度_score=0.0
GET /mall/product/_search
{
  "query": {
    "bool": {
      "filter": {
        "range": {
          "price": {
            "gte": 30
          }
        }
      }
    }
  }
}
1
2
3
4
5
6
7
8
9
10
11
12
13
14
15
16
17
18
19
20
21
22
23
24
25
26
27
28
29
30
31
32
33
34
35
36
37
38
39
40性能
- filter不会计算相关度,不会排序,同时还有内置的自动cache最常使用filter的功能
- query,相反,无法cache结果
# 3、query搜索语法
match_all,查询所有
match,field
GET /mall/product/_search
{
  "query": {
    "match": {
      "name": "lu"
    }
  }
}
1
2
3
4
5
6
7
8multi_match
GET /mall/product/_search
{
  "query": {
    "multi_match": {
      "query": "special",
      "fields": ["name", "producer"]
    }
  }
}
1
2
3
4
5
6
7
8
9range query
term query,精确匹配,不会分词
terms query
# 4、排序
数值排序
GET /mall/product/_search
{
  "sort": [
    {
      "price": {
        "order": "desc"
      }
    }
  ]
}
1
2
3
4
5
6
7
8
9
10字符串排序
为了防止,排序的时候,字符串分词,而造成的排序问题,所以需要对字符串额外存储一个不分词的值,keyword表明该字段不会分词
PUT /mall3
{
   "mappings": {
     "test": {
       "properties": {
        "desc2": {
          "type": "text",
          "fields": {
            "raw":{
              "type": "keyword"
            }
          },
          "fielddata": true
        }
      }
     }
   }
}

GET /mall3/test/_search
{
  "query": {
    "match_all": {}
  },
  "sort": [
    {
      "desc2.raw": {
        "order": "desc"
      }
    }
  ]
}
1
2
3
4
5
6
7
8
9
10
11
12
13
14
15
16
17
18
19
20
21
22
23
24
25
26
27
28
29
30
31
32
# 4、相关度分析
# 1、相关度评分
Term frequency : 搜索文本中各个词条在field文本中出现了多少次,越多,相关度越高
Inverse document frequency : 根据搜索请求的词条,查看这个词条在所有的document中,一共出现的次数,出现次数越多,相关度越弱
搜索请求: hello world

doc1: hello, today is very good
doc2: hi world, how are you

index总数据1w,hello出现了1000次,world出现了100次,doc2更相关
1
2
3
4
5
6Field-length norm : field越长,相关度越弱
搜索请求: hello world

doc1: {"title": "hello article", "content": "asdfgh"}
doc2: {"title": "my article", "content": "asdfgh, world"}

hello、world在doc1、doc2出现的次数一样多,都是一次,但是,title字段比content要短,所以doc1相关度更高
1
2
3
4
5
6
# 5、doc-value
# 1、索引
倒排索引用于搜索,正排索引用来排序分组聚合
doc1: {"name": "t01", “age”: 1, "content": "hello you as fdg"}
doc2: {"name": "t02", "age": 2, content": "hello asd s world"}

搜索请求: hello world

倒排索引
				doc1	doc2
hello  	1			1
you
as
fdg
asd
s
world					1
搜索结果 doc1,doc2,且doc2的相关度评分更高

正排索引
	document 	name		age 	content
	doc1			test01	1			hello you as fdg
	doc2			test02	2			hello asd s world
2
3
4
5
6
7
8
9
10
11
12
13
14
15
16
17
18
19
20
# 6、scroll 滚动搜索
- 看起来像分页,分页是一页一页搜索,返回给用户看的
- scroll主要是用来一批一批检索数据,让系统进行处理的,第一次新建scroll,下一次只需要拿到scroll_id即可,滚动查询了,不需要在写查询条件,他是会在设置的超时时间内有效
GET /mall/product/_search?scroll=1m
{
  "query": {
    "match_all": {}
  },
  "sort": [
    {
      "price": {
        "order": "desc"
      }
    }
  ],
  "size": 2
}

GET /_search/scroll
{
  "scroll": "1m",
  "scroll_id": "上一步返回的_scroll_id值"
}
2
3
4
5
6
7
8
9
10
11
12
13
14
15
16
17
18
19
20
# 7、索引维护
可以对索引的分片副本进行设置,注意,索引一旦创建number_of_shards不能改,number_of_replicas还能改
# 1、创建索引
PUT /my_index
{
  "settings": {
    "number_of_shards": 1,
    "number_of_replicas": 0
  },
  "mappings": {
    "my_type": {
      "properties": {
        "field01": {
          "type": "text"
        }
      }
    }
  }
}
2
3
4
5
6
7
8
9
10
11
12
13
14
15
16
# 2、修改
PUT /my_index/_settings
{
  "number_of_replicas": 1
}
2
3
4
# 3、删除
DELETE /my_index
# 8、应用零停机,重建索引
# 1、为什么要重建索引?
概述:
因为index一旦建立,已有的field是不能被修改的,可以添加新的field,添加的话,停机后在开发才有意义
为什么index不可变?(一下很多不是很理解)
倒排索引是适用于进行搜索的
倒排索引的结构
descript		doc1		doc2
qwe					1				1
asd					1
zxc									1
1
2
3
4- 包含这个关键词的document list
- 包含这个关键词的所有的document的数量IDF
- 这个关键词在每个document中出现的次数IF
- 这个关键词在这个document中的次序
- 每个document的长度
- 包含这个关键词的所有document的平均长度
倒排索引不可变的好处
- 不需要锁,提升并发能力,避免锁的问题
- 数据不变,一只保存在os cache中,只要cache内存足够
- filter cache一只在内存中,因为数据不变
- 可以压缩,节省cpu和io开销
坏处
- 每次都要重新构建索引
# 2、是什么引起,需要重建索引
业务变化,需要对某些field做一些更新
数据初始化的时候,由于数据问题,倒是索引mapping不对
在index还未建立的时候,希望通过 dynamic mapping来建立索引存储数据的情况(没有预先建立索引的mapping,而是等待,传入的第一条数据,自动解析数据类型建立mapping)。例如,title,预期是text,但是在初始化的时候,传进来了“2020-04-16”,此时title字段类型是date,以后传入普通文本的时候,就会报错,类型不对
GET /my_index/my_type/1

GET /my_index/_mapping

//type date
PUT /my_index/my_type/1
{
  "title": "2020-04-16"
}

//报错:类型不匹配
PUT /my_index/my_type/2
{
  "title": "dqw"
}
1
2
3
4
5
6
7
8
9
10
11
12
13
14
15
# 3、如何解决?实现应用的零停机?
解决思路:
reindex,重新建立索引,将旧索引的数据查询出来,在导入到新索引中
步骤:
给每个index起一个别名,java应用查询的时候,使用别名索引,这样就能够临时建立一个新的索引,把旧索引数据导入到新索引中,新索引别名与java应用使用的一致即可
注意,根据别名索引查询的时候,需关注返回结果_index字段,若这个别名是多个索引的映射,查询结果 _index是不同的,数据是他对应的所有索引的。
//先查询旧索引mapping
GET /my_index/_mapping

//给索引起别名,java应用应该始终使用这个别名查询
PUT /my_index/_alias/lu_index

//查询别名对应的索引,以此来锁定关系,排错
GET /lu_index/_alias

//建立新的索引
PUT /my_index_new
{
  "mappings": {
    "my_type": {
      "properties": {
        "title": {
          "type": "text"
        }
      }
    }
  }
}

//查询旧索引的数据,scroll 滚动查询配合bulk,是比较提倡的,既好控制bulk数量过大,也采用了批处理提高执行效率
GET /my_index/_search?scroll=1m
{
  "query": {
    "match_all": {}
  },
  "sort": "_doc",
  "size": 1
}

//封装数据,批量更新到新索引中
GET /_search/scroll
{
  "scroll": "1m",
  "scroll_id": "上面返回的_scroll_id"
}
POST /_bulk
{"index": {"_index": "my_index_new", "_type": "my_type", "_id": 1}}
{"title": "2020-04-16"}

//更新别名,移除旧索引的别名映射,改为新索引的别名
POST /_aliases
{
  "actions": [
    {
      "remove": {
        "index": "my_index",
        "alias": "lu_index"
      }
    },
     {
      "add": {
        "index": "my_index_new",
        "alias": "lu_index"
      }
    }
  ]
}
1
2
3
4
5
6
7
8
9
10
11
12
13
14
15
16
17
18
19
20
21
22
23
24
25
26
27
28
29
30
31
32
33
34
35
36
37
38
39
40
41
42
43
44
45
46
47
48
49
50
51
52
53
54
55
56
57
58
59
60
61
# 三、问题
# 1、bouncing results
问题描述:
回顾es查询过程:
客户端随机发送查询请求给一个node,node ha sh,routing之后,打到另一台node,该node就是本次查询的协调节点,协调节点,会根据查询条件,去每个primary shard获取数据(当然,如果开启了replica shard 则每个primary shard与之对应的replica shard 之间会采用轮训算法,来处理请求),最后由协调节点merge,进一步算分、排序、集合...
问题解释:
这过程,会出现 bouncing results问题,即,查询结果跳跃,即相同的查询条件,每次查询出来的结果不同
问题原因:
- 原因一:es每次查询,是按照负载均衡轮训算法,从不同replica shard获取数据的,在高并发实时写入数据的场景下,不能保证同一时刻每一个replica shard数据都是一致的,这个原因官方没有明确指出,单纯是个人理解
- 原因二:由于es写的时候,对于replica shard同步之间是并行的,每个请求之间是无序的,故很容易产生,timestamp一样,且顺序不同的文档数据,在各个replica shard,当客户端采用timestamp排序时,由于每次请求达到的shard不同(由于轮训算法),所以每次结果的顺序不同,协调节点merge结果自然也不同
问题解决
-
解决思路,实际上就是,查询的时候,确定分片副本查询即可,所以需要设置preference。但是这样的话,单台服务器节点压力会加重,所以还需要切合业务场景去尝试,靠经验
-